Friday 23 September 2016

How to get all groups that a user is a member of?

Open up Active Directory Module for Windows Powershell and the run the command below.
(replace the word username with the AD user in question)

Get-ADPrincipalGroupMembership username | select name


Tuesday 23 August 2016

Configure a DNS Server to Use Forwarders


Setup DNS to use Forwarders.

(Scenario) Multiple domain controllers based globally, machine in question is going to be used as a DNS forwarder to other servers. The server is also on the domain. The server also has a static ip address and the dns entries in place can detect the master servers we will be using.


- Install DNS role on server of choice
- Open DNS Manage head to “Forward Lookup Zones”
- Add new Forward Lookup Zone
- Select Stub Zone
- Create zone name as the domain name e.g for this example companyname.local or company.com
- Choose “create a new file with this file name” and confirm it says yourcompanyname.local.dns
- Master DNS Servers addresses entry (input your DNS/DC Servers based off site. Type them in and confirm the name of the server FQDN is correct and validated)
- Click next and confirm everything is correct and choose finish.


The next stage would be to open the folder “Forward Lookup Zones” and locate the yourcompanylocal sub folder. Right click on this folder and head to properties.


Under general tab click on the Edit button for Master Servers. Confirm the only ip’s are the forwarding DNS/DC addresses.


The final thing to do is to change your DNS entries to 127.0.0.1 and confirm you can ping an external address, an internal address (e.g yourcompanyname2.local) and a nslookup for an internal address.


Friday 8 July 2016

Dell OpenManage Server Administrator download

Dell deleted their Dell Open Manage System Administrator page today, no idea why.

But here's the same page from a cached version of the website.

All the links are still valid:

Dell OpenManage Server Administrator

Dell OpenManage Server Administrator (OMSA) provides a comprehensive, one-to-one systems management solution in the following two ways:

  • From an integrated, web browser-based Graphical User Interface (GUI)
  • Through a Command Line Interface (CLI) via the Operating System (OS)
Server Administrator is designed for system administrators to focus on managing their entire network while providing one-to-one systems management locally and remotely.

Latest release v8.2 [15 September 2015] is available now.

To download, please choose an Operating System for which the Server Administrator is required:

Windows:

Linux:

ESXi VIB:

To use the ESXi VIB with the VMWare vSphere application, please utilize the packages found at the Dell VMWare depot.

For additional help or information about Dell OpenManage Server Administrator, please refer to the Dell TechCenter wiki: http://en.community.dell.com/techcenter/systems-management/w/wiki/1760

http://www.dell.com/support/contents/uk/en/ukdhs1/article/Product-Support/Self-support-Knowledgebase/enterprise-resource-center/Enterprise-Tools/OMSA

Thursday 2 June 2016

ESXI Host


esxcli software vib update -d /vmfs/volumes/datastore1/update-from-esxi6.0-6.0_update02.zip

Wednesday 1 June 2016

Mount VMFS Datastore – via GUI or via CLI

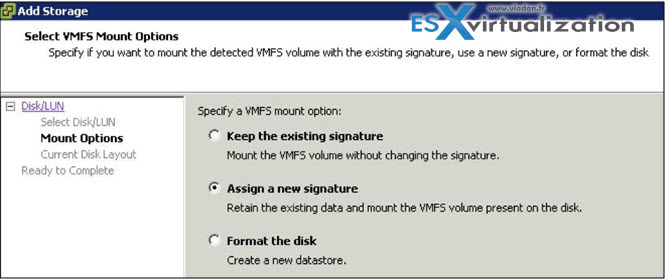
You can resignature a disk by using the vSphere Client or using the command line. vSphere client gave me no results recently, but normally it’s very easy. You just do it when you firstselect your host > configuration > storage > add storage >  chose disk/lun > and choose the option you want.
Select Assign new signature or keep existing signature, depending on your needs, and click next, next …
how to resignature VMFS

Using ESXCLI

We can list all detected VMFS snapshot volumes with the following command, even if for some reason we aren’t able to mount the volume from within vSphere client (it was my case in a lab recently…).
This command will list the names of the VMFS datastores and their UUIDs.
esxcfg-volume –l
As you can see in our case we have the output like this:
Mounting VMFS datastore manually is sometimes necessary when working with DR plans. A volume that isn't automatically mounted on the other side has to be mounted manually. Sometimes when an existing VMFS volume           Keep the existing signature. You cannot mount two datastores with the same UUID on the same host.  ESX uses the UUID to reference the device. As such, two with the same UUID would cause all kinds of issues. However, you may unmount the initial datastore and bring the duplicate datastore with the same UUID online. You can however mount a snapshot/replicated lun, whilst keeping the existing signature, on a host that does not have access to the original lun (this is most commonly seen when carrying out a DR plan). Assign a new signature. This will change the UUID and allow it to be mounted.     There are some things to bear in mind before you make your choice. Creating a new signature for a drive is irreversible – once you have applied the new signature you cannot get the old one back. A datastore with extents may only be resignatured if all extents are online. Finally, if a datastore is resignatured, the VMs that use a datastore must be reassociated with the disk in their respective configuration files. The virtual machines must also be re-registered within vCenter.  The most common scenario in which I come across having to deal with this issue is when working with a disaster recovery plan. When Site Recovery Manager isn’t it use, it is necessary to carry out the mounting of replicated/snapshot luns manually. In this situation it is usually ok to mount the lun without resignaturing  because the host to which you mount the lun is likely in a DR site, and as such doesn’t have access to the original lun. Basically, it’s fine not to perform the resignature when mounting the volume on a host that is unable to see the original disk. Resignaturing becomes important when you need to mount a replicated lun on the same host(s) that have the original mounted.  So, hows it done? You can resignature a disk by using the vSphere Client or using the command line.  Using ESXCLI we can list all detected VMFS snapshot volumes with the following: <blockquote>esxcli storage vmfs snapshot list</blockquote>   This will list the names of the VMFS datastores and their UUIDs. We can then mount the volumes using:  esxcli storage vmfs snapshot resignature –volume-label=<label>|–volume-uuid=<id> As these commands are ran directly on a host, it is necessary to run them on each host in a cluster, if you want to make the volume available to each. NOTE: You will only be able to mount the volume if it has been enabled for Read/Write access – in most environments this will be handled by the storage guys.  As an alternative you can also use the esxcfg-* commands, as follows:  ‘esxcfg-volume –l’ to see a list of copied volumes  Choose either;  ‘esxcfg-volume –r to resignature the volume  ‘esxcfg-volume –M to mount the volume without resignaturing (use lower case m for temporary mount rather than persistent). The process using the vSphere client is as follows:  On your chosen host, browse to the Configuration | Storage tab Click Add Storage Select Disk/LUN and click Next Select the device you wish to add add and click Next Select Assign new signature or keep existing signature, depending on your needs, and click                 <strong>1. Log in to the vSphere Client and select the server from the inventory panel.</strong>  <strong>2. Click the Configuration tab and click Storage in the Hardware panel.</strong>  <strong>3. Click Add Storage.</strong>  <strong>4. Select the Disk/LUN storage type and click Next.</strong>  <strong>5. From the list of LUNs, select the LUN that has a datastore name displayed in the VMFS Label column and</strong>  <strong>click Next.</strong>  <strong>The name present in the VMFS Label column indicates that the LUN is a copy that contains a copy of an</strong>  <strong>existing VMFS datastore.</strong>  <strong>6. Under Mount Options, select Keep Existing Signature.</strong>  <strong>7. In the Ready to Complete page, review the datastore configuration information and click Finish.</strong>        o you are forced to this as described in the knowledge base article above in workaround B (By connecting directly to the ESX host service console):  1. Log in as root to the ESX host which cannot mount the datastore using an SSH client.  2. Run the command:  esxcfg-volume -l  The results appear similar to:  VMFS3 UUID/label: 4b057ec3-6bd10428-b37c-005056ab552a/ TestDS  Can mount: Yes  Can resignature: Yes  Extent name: naa.6000eb391530aa26000000000000130c:1 range: 0 – 1791 (MB)  Record the UUID portion of the output. In the above example the UUID is 4b057ec3-6bd10428-b37c-005056ab552a.  Note: The Can mount value must be Yes to proceed with this workaround.  3. Run the command:  esxcfg-volume -M <UUID>  Where the <UUID> is the value recorded in step 3.  Note: If you do not wish the volume mount to persist a reboot, the -m switch can be used instead.
Choose either:
esxcfg-volume –r
to resignature the volume. The general syntax is following:
esxcli storage vmfs snapshot resignature –volume-label=<label>|–volume-uuid=<id>
OR use the “M” switch (note it’s a Capital M) to mount the volume as is (keep existing signature):
esxcfg-volume –M
to mount the volume without resignaturing (use lower case m for temporary mount rather than persistent).
mount existing VMFS volume
Yes, if you do not wish the volume mount to persist a reboot, the -m switch shall be used instead.

source:http://www.vladan.fr/mount-vmfs-datastore/

Wednesday 25 May 2016

Set secure password on Cisco Router/Switch

- enable
- config t
- enable password YourPasswordOfChoice
- enable secret HasToBeDifferent
service password-encryption (to encrypt password)
- exit
- wr

connect two routers using cross over cable and static route

Network Examples
"network one"
Port 1(0/1) (which goes to pc's) 192.168.1.1
Port 2(0/2(Which goes to wan and other router) 192.168.3.254
"network two"
Port 1(0/1)(which goes to pc's) 192.168.2.1
Port 2(0/2) (which goes to wan and other router)
192.168.3.253

Network one router
- en
- config terminal
- interface fastethernet 0/2
- ip address 192.168.3.254 255.255.255.0
- ip route 192.168.2.0 255.255.255.0 192.168.3.253
- no shutdown
- exit
- wr

Network two switch
- en
- config terminal
- interface fastethernet 0/2
- ip address 192.168.3.253 255.255.255.0
- ip route 192.168.1.0 255.255.255.0 192.168.3.254
- no shutdown
- exit
- wr

https://www.youtube.com/watch?v=9Ow8BQueLNw

Connect two cisco routers using serial port

Router 1
- Connect to CLI
- type enable
- config terminal
- interface serial 1/0 (or your preferred port)
- ip address 192.168.2.254 255.255.255.0 (of the connecting network/router)
- clock rate 64000
- no shutdown

Router 2
- Connect to CLI
- type enable
- config terminal
- interface serial 1/0 (or your preferred port)
- ip address 192.168.2.253 255.255.255.0 (of the connecting network/router)
- no shutdown

Setup Cisco Router and add ip address

Any Cisco Router
- Connect to CLI
- Continue with configuration dialog (type for N for no)
- Then type "enable" to access admin
- Then type "config terminal" to access config
- Then type "interface fastEthernet 0/0" can be any port to which you prefer 0/1 etc,
- Then type "ip address 192.168.2.1 255.255.255.0" can be any range
- Then type "description nameofrouter" name the router anything you like
- Then type "no shutdown" to enable the port

Thursday 28 April 2016

Converting existing Windows Server 2012 versions

Converting existing Windows Server 2012 versions

At any time after installing Windows Server 2012, you can run Setup to repair the installation (sometimes called “repair in place”) or, in certain cases, to convert to a different edition.
You can run Setup to perform a “repair in place” on any edition of Windows Server 2012; the result will be the same edition you started with.
For Windows Server 2012 Standard, you can convert the system to Windows Server 2012 Datacenter as follows: From an elevated command prompt, determine the current edition name with the command DISM /online /Get-CurrentEdition. Make note of the edition ID, an abbreviated form of the edition name. Then run DISM /online /Set-Edition:<edition ID> /ProductKey:XXXXX-XXXXX-XXXXX-XXXXX-XXXXX /AcceptEula, providing the edition ID and a retail product key. The server will restart twice.
For Windows Server 2012 Essentials, you can run Setup and convert it to Windows Server 2012 Standard by providing the appropriate retail license key.

https://technet.microsoft.com/en-gb/library/jj574204.aspx


Wednesday 20 April 2016

update/patch your vCenter 6.x Appliance using iso and cli

To update/patch your vCenter 6.x Appliance, please follow the below steps:
  1. Download VCSA patch from here.
    How to update or patch vCenter 6 Appliance (VCSA)
    Product Patches - VMware site.
  2. Take a snapshot of VCSA.
  3. Connect downloaded ISO file to the VCSA VM.
  4. Log in to the VCSA via SSH.
  5. Run the following command.
    Command> software-packages install --iso --acceptEulas
  6. Accept EULA and wait till patching/updating will be finished:
    [2015-04-28T15:15:12.118] : Staging software update packages from ISO
    [2015-04-28T15:15:13.118] : ISO mounted successfully
    [2015-04-28 15:15:13,198] : Running pre-stage script.....
    [2015-04-28T15:15:14.118] : Verifying staging area
    [2015-04-28T15:15:14.118] : Validating software update payload
    [2015-04-28T15:15:14.118] : Validation successful
    [2015-04-28 15:15:51,055] : Processing software packages in update payload 36/36
    [2015-04-28T15:16:18.118] : ISO unmounted successfully
    [2015-04-28T15:16:18.118] : (34) packages staged successfully
    [2015-04-28 15:16:18,694] : Running test transaction ....
    [2015-04-28 15:16:24,707] : Running pre-install script.....
    [2015-04-28T15:18:23.118] : Services stopped.
    [2015-04-28 15:18:23,082] : Upgrading software packages ....
    [2015-04-28 15:21:04,355] : Running post-install script.....
    [2015-04-28T15:21:05.118] : Packages upgraded successfully, Reboot is required to complete the installation.
  7. Reboot VCSA by running:
    shutdown reboot -r updating
  8. vCenter Appliance build should be changed
How to update or patch vCenter 6 Appliance (VCSA) - new build
New VCSA build version.

Sunday 17 April 2016

Remove DAG database - powershell

Remove-MailboxDataBaseCopy -Identity "Mailbox Database 0577530383\MB04" -Confirm:$True
Remove-DatabaseAvailabilityGroupServer -MailboxServer MB03 -Identity dag15
Remove-DatabaseAvailabilityGroup -Identity dag15

*Mailbox Database 0577530383 = name of database
*MB04, MB03 = location of server 
*DAG15 = name of dag

Monday 4 April 2016

deny remote desktop web access with active directory

To restrict this, first we need to create a security group in AD. 
Now log into your RD Web Access server and browse to C:\Windows\Web. Right-click the RDWeb folder and choose Properties.
Go to the Security tab and click Edit then Add.

    
Type the security group name that you just created in AD and hit OK.
Back in the Permissions window, make sure the group is selected, then in the Permissions section (bellow) click the Read & Executebox under the Deny column. Click OK to close all the windows. Choose Yes on the warning messages.
Now, if a user that is part of that security group tries to log in, it will get a deny message. In the future, when you want to restrict someone to log in to RD Web Access just add the account to that security group.
http://www.vkernel.ro/blog/restrict-users-from-login-to-remote-desktop-web-access

Friday 18 March 2016

Setup DAG on exchange 2010

Best sources I found for setting up DAG on exchange 2010

http://www.techrid.com/exchange-server-2010/high-availability/dag/creating-dag-step-by-step-in-exchange-2010/
http://exchangeserverpro.com/exchange-server-2010-database-availability-group-installation-step-by-step/
https://technet.microsoft.com/en-us/library/ff367878(v=exchg.141).aspx

Thursday 17 March 2016

install programs as a domain user in command prompt

Came across this scenario at work today.

- You need to install a program (e.g flash player) on a machine at work.
  • The only way you have access is remotely via a program called BeAnywhere , which is one time session software with no admin privileges.
  • They don't have team viewer or logmein installed. 
  • The user logged in, is a domain user with no admin privileges.
  • There's no admin users onsite to help out.
  • Because of security you don't want to give out admin passwords over the phone to log on as a different user.
  • You don't know local admin account details.
  • There's an option for admin rights in beanywhere but this doesn't work because of the UAC splash screen asking for admin username and password


Things you do have/could do.
  • it is on the domain and you have domain admin details.
  • You have a third party tool which can reset the local admin password but this is very time consuming.
  • You can send an engineer to site to logon as a domain admin.(again time consuming)
  • You could install the packages via MSI but again this is time consuming, so what's the quickest method.


What do you do? 
sounds like there's no solution right?
Well..there is. If you as an administrator haven't disabled command prompt for domain users.
It's possible to install programs via a domain users command prompt. Even though the command prompt isn't opened with elevated rights.

What to do:
Open command prompt without elevated rights.
Then type:
runas /noprofile /user:DOMAIN\adminaccount "C:\Users\domainuser\Downloads\installpath.exe"

alternatively install a .msi file.


runas /noprofile /user:NGA\cbsadmin "msiexec /i \"C:\Users\localadmin\Downloads\logmein.msi""


This will in turn ask for the domain admin password.

Example below:


Monday 14 March 2016

Number of podcasts showing up in iTunes or Feed

 To change the number of items per feed, go to your WordPress admin, to the “Settings” section and select “Reading”. For the option labeled “Syndication feeds show the most recent”, enter the value you desire.

source:
http://www.powerpresspodcast.com/2011/08/12/number-of-podcasts-showing-up-in-itunes-or-feed/

Friday 11 March 2016

Rollback net framework 4.6.1 to 4.5.2

  1. If the server has already automatically updated to 4.6.1 and has not rebooted yet, do so now to allow the installation to complete
  2. Stop all running services related to Exchange.  You can run the following cmdlet from Exchange Management Shell to accomplish this:  (Test-ServiceHealth).ServicesRunning | %{Stop-Service $_ -Force}
  3. Go to add/remove programs, select view installed updates, and find the entry for KB3102467.  Uninstall the update.  Reboot when prompted.
  4. Check the version of the .NET Framework and verify that it is showing 4.5.2.  If it shows a version prior to 4.5.2 go to windows update, check for updates, and install .NET 4.5.2 via the KB2934520 update.  Do NOT select 4.6.1/KB3102467.  Reboot when prompted.  If it shows 4.5.2 proceed to step 5.
  5. Stop services using the command from step 2.  Run a repair of .NET 4.5.2 by downloading the offline installer, running setup, and choosing the repair option.  Reboot when setup is complete.
  6. Apply the February security updates for .NET 4.5.2 by going to Windows update, checking for updates, and installing KB3122654 and KB3127226.  Do NOT select KB3102467.  Reboot after installation.
  7. After reboot verify that the .NET Framework version is 4.5.2 and that security updates KB3122654 and KB3127226 are installed.
  8. Follow the steps here to block future automatic installations of .NET 4.6.1.