Wednesday 24 May 2017

Install NetFramework 3.5 offline


I faced a problem at a customer site last week when I tried to install the .NET Framework 3.5 – a prerequisite for installing SQL Server 2012 on a Windows Server 2012 R2. I opened the Server Manager and then navigated to the Manage, Add Roles and Features section:
b2ap3_thumbnail_pic01.jpg
I selected the .NET Framework 3.5 Features option:
b2ap3_thumbnail_pic02.jpg
I specified an alternate source path:
b2ap3_thumbnail_pic03.jpg
… and surprise! Even though an ISO of Windows Server 2012 R2 was mapped to my D: drive, the installation failed with this strange error: “The source file could not be found…”
After some investigations, I found that this problem is quite common and that Microsoft has published a fix … which unfortunately does not work for me!
I tried the same installation with different ways: command prompt, PowerShel l… but absolutely NO RESULT.
I finally decided to open a PowerShell console to check the Windows Features available on my server with the cmdlet Get-WindowsFeature:
b2ap3_thumbnail_Pic1.jpg
Strangely, the status of the .NET Framework 3.5 is not showing “Available”, but “Removed”!
b2ap3_thumbnail_Pic2.jpg
So, how do I change this state from removed to available?
After some investigations and after having tried some fixes provided by persons who faced to the same problem as me, I finally found the Standalone Offline Installer tool that solved my problem by enabling the .NET Framework 3.5 (many thanks to Abbodi1406).
I downloaded this exe file and executed it on my server.
An installer screen appeared:
b2ap3_thumbnail_pic4.jpg
After clicking on the Next button, a command prompt screen appeared which showed the completion state of the process.
pic6.jpg
As soon as the process was finished, I went back to my PowerShell screen to check if my .NET Framework 3.5 is now available – by running my PowerShell cmdlet Get-WindowsFeature:
b2ap3_thumbnail_pic10.jpg
The .NET Framework 3.5 now was available and I as able to restart the installation process from the beginning by navigating to the server manager, selecting the concerned feature and giving the alternate source path.
pic8.jpg
I finally succeded in installing my .NET Framework 3.5!

credit:https://blog.dbi-services.com/winows-server-2012-r2-failed-to-install-net-framework-35/

Tuesday 16 May 2017

Update ESXI via putty (SSH) and vSphere client. 6.0 Update 3

https://kb.vmware.com/selfservice/microsites/search.do?language=en_US&cmd=displayKC&externalId=2008939

To patch an ESXi 5.x/6.x host from the command line:

  1. Patches for VMware products can be obtained from the VMware patch portal. Select ESXi (Embedded and Installable) in the product dropdown and click Search.
  2. Click the Download link below the patch Release Name to download the patch to your system.
  3. Upload the patch to a datastore on your ESXi 5.x/6.x host using the Datastore Browser from vCenter Server or a direct connection to the ESXi 5.x/6.x host using the vSphere Web client.

    Note: VMware recommends creating a new directory on the datastore and uploading the patch file to this directory.
  4. Log in to the local Tech Support Mode console of the ESXi 5.x/6.x host. For more information, see Using Tech Support Mode in ESXi 4.1 and ESXi 5.x (1017910).
  5. Migrate or power off the virtual machines running on the host and put the host into maintenance mode. The host can be put into maintenance mode by running this command:

    # vim-cmd hostsvc/maintenance_mode_enter
  6. Navigate to the directory on the datastore where the patch file was uploaded to and verify that the file exists by running these commands:

    # cd /vmfs/volumes/Datastore/DirectoryName
    # ls


    Where Datastore is the datastore name where the patch file was uploaded to, and DirectoryName is the directory you created on the datastore.
  7. Install or update a patch on the host using these esxcli commands:

    Notes:

    • To install or update a .zip file, use the -d option. To install or update a .vib file use the -v option.
    • Using the update command is the recommended method for patch application. Using this command applies all of the newer contents in a patch, including all security fixes. Contents of the patch that are a lower revision than the existing packages on the system are not applied.
    • Using the install command overwrites the existing packages in the system with contents of the patch you are installing, including installing new packages and removing old packages. The install command may downgrade packages on the system and should be used with caution. If required, the install command can be used to downgrade a system (only for image profiles) when the --allow-downgrade flag is set.
    Caution: The install method has the possibility of overwriting existing drivers. If you are using third-party ESXi images, VMware recommends using the update method to prevent an unbootable state.
    To Install:

    • Using local setup:

      # esxcli software vib install -d "/vmfs/volumes/Datastore/DirectoryName/PatchName.zip"

      Where PatchName.zip is the name of the patch file you uploaded to the datastore.

      Note: Alternatively, you can use the datastore's UUID instead of the DirectoryName .

      For example:

      # esxcli software vib install -d "/vmfs/volumes/datastore1/patch-directory/ESXi500-201111001.zip"

      or

      # esxcli software vib install -d "/vmfs/volumes/a2bb3e7c-ca10571c-cec6-e5a60cc0e7d0/patch-directory/ESXi500-201111001.zip"
    • Using http setup:

      # esxcli software vib install -v viburl

      Where viburl is the URL to the http depot where VIB packages reside.

      For example:

      # esxcli software vib install -v https://hostupdate.vmware.com/software/VUM/PRODUCTION/main/esx/vmw/vib20/tools-light/VMware_locker_tools-light_5.0.0-0.7.515841.vib
    To Update:

    • Using local setup:

      # esxcli software vib update -d "/vmfs/volumes/Datastore/DirectoryName/PatchName.zip"

      Where PatchName.zip is the name of the patch file you uploaded to the datastore.

      Note: Alternatively, you can use the datastore's UUID instead of the DirectoryName .

      For example:

      # esxcli software vib update -d "/vmfs/volumes/datastore1/patch-directory/ESXi500-201111001.zip"

      or

      # esxcli software vib update -d "/vmfs/volumes/ a2bb3e7c-ca10571c-cec6-e5a60cc0e7d0 /patch-directory/ESXi500-201111001.zip"
    • Using http setup:

      # esxcli software vib update -v viburl

      Where viburl is the URL to the http depot where VIB packages reside.

      For example:

      # esxcli software vib update -v https://hostupdate.vmware.com/software/VUM/PRODUCTION/main/esx/vmw/vib20/tools-light/VMware_locker_tools-light_5.0.0-0.7.515841.vib
  8. Verify that the VIBs are installed on your ESXi host:

    # esxcli software vib list

    For example:

    # esxcli software vib list

    Name              Version                     Vendor Acceptance Level Install Date
    ----------------- --------------------------- ------ ---------------- ------------
    ata-pata-amd      0.3.10-3vmw.500.0.0.469512  VMware VMwareCertified  2012-05-04
    ata-pata-atiixp   0.4.6-3vmw.500.0.0.469512   VMware VMwareCertified  2012-05-04
    ata-pata-cmd64x   0.2.5-3vmw.500.0.0.469512   VMware VMwareCertified  2012-05-04
    ata-pata-hpt3x2n  0.3.4-3vmw.500.0.0.469512   VMware VMwareCertified  2012-05-04

  9. After the patch has been installed, reboot the ESX host:

    # reboot
  10. After the host has finished booting, exit maintenance mode and power on the virtual machines:

    # vim-cmd hostsvc/maintenance_mode_exit 

Thursday 11 May 2017

Using AD signed certificates with vCenter Server Appliance 6

Creating signed certs for vCenter has never been easy, with the new release of 6.0 though this has changed somewhat, there is a built in certificate manager that allows you to import a CA (say Microsoft AD) cert and key to have VMCA sign it’s own certs with and make them trusted.
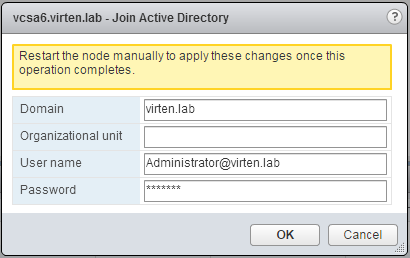
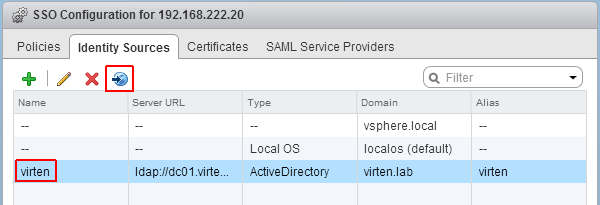
First thing, we need to set up an AD cert template for vSphere 6.0, that’s in my article here.
Next, log in to your vCenter Server Appliance as root and enter:
shell.set --enabled True
shell
This will get us access to the VCSA underlying OS CLI
Create a directory to store our csr and key:
mkdir /root/SSLCerts
Next we will need to launch the certificate manager, execute:
/usr/lib/vmware-vmca/bin/certificate-manager
You will see a display like so:
 _ _ _ _ _ _ _ _ _ _ _ _ _ _ _ _ _ _ _ _ _ _ _ _ _ _ _ _ _ _ _ _ _ _ _ 
|                                                                     |
|      *** Welcome to the vSphere 6.0 Certificate Manager  ***        |
|                                                                     |
|                   -- Select Operation --                            |
|                                                                     |
|      1. Replace Machine SSL certificate with Custom Certificate     |
|                                                                     |
|      2. Replace VMCA Root certificate with Custom Signing           |
|         Certificate and replace all Certificates                    |
|                                                                     |
|      3. Replace Machine SSL certificate with VMCA Certificate       |
|                                                                     |
|      4. Regenerate a new VMCA Root Certificate and                  |
|         replace all certificates                                    |
|                                                                     |
|      5. Replace Solution user certificates with                     |
|         Custom Certificate                                          |
|                                                                     |
|      6. Replace Solution user certificates with VMCA certificates   |
|                                                                     |
|      7. Revert last performed operation by re-publishing old        |
|         certificates                                                |
|                                                                     |
|      8. Reset all Certificates                                      |
|_ _ _ _ _ _ _ _ _ _ _ _ _ _ _ _ _ _ _ _ _ _ _ _ _ _ _ _ _ _ _ _ _ _ _|
We are going to use option 1 to replace the machine_ssl cert an AD signed one.
You will now be prompted for your SSO user password (usually [email protected] unless you’ve changed it during setup like me), so enter it.
No you’re going to be asked:
     1. Generate Certificate Signing Request(s) and Key(s) for Machine SSL certificate

     2. Import custom certificate(s) and key(s) to replace existing Machine SSL certificate

Option [1 or 2]: 1
We want to choose option 1 to generate the csr for signing by AD.
Choose an output directory (/root/SSLCerts created earlier).
Please provide a directory location to write the CSR(s) and PrivateKey(s) to: 
Output directory path: /root/SSLCerts
2015-07-19T18:48:25.878Z   Running command: ['/usr/lib/vmware-vmca/bin/certool', '--genkey', '--privkey', '/root/SSLCerts/machine_ssl.key', '--pubkey', '/tmp/pubkey.pub']
2015-07-19T18:48:26.144Z   Done running command
2015-07-19T18:48:26.145Z   Running command: ['/usr/lib/vmware-vmca/bin/certool', '--gencsrfromcert', '--privkey', '/root/SSLCerts/machine_ssl.key', '--cert', '/tmp/vecs_crt.crt', '--csrfile', '/root/SSLCerts/machine_ssl.csr']
2015-07-19T18:48:26.245Z   Done running command

CSR generated at: /root/SSLCerts/machine_ssl.csr
As you can see the .csr was generated at: /root/SSLCerts/machine_ssl.csr so we will cat the output file (open another ssh session to the vc) to get the csr:
cd /root/SSLCerts/
cat machine_ssl.csr
Output will be in standard csr format:
vc1:~/SSLCerts # cat machine_ssl.csr 
-----BEGIN CERTIFICATE REQUEST-----
{CSR HERE}
-----END CERTIFICATE REQUEST-----
Load up AD CertSvc (usually at: https://{DCnameorIP}/CertSrv/en-US/) and follow this procedure:
  • Request Certificate
  • Advanced Certificate Request
  • Certificate Template: vSphere 6.0
  • Paste the csr in and click submit.
CSR Request
Next, download the certificate as Base 64 encoded (not the chain!).
Open the cert with notepad/sublime text or such and paste the content into a new file on the vcsa:
vi /root/SSLCerts/machine_ssl.cer
Put vi into insert mode:
i
Paste in the contents of the cer file, then hit Esc, write and quit the file:
:wq
Download the CA root certificate in Base 64 also and add it to another file, as above, called ca.cer.
You should now have 4 files in /root/SSLCerts/:
  • ca.cer
  • machine_ssl.cer
  • machine_ssl.csr
  • machine_ssl.key
Back in the first ssh session where certificate manager is running enter option 1 and enter the requested signed cert file paths:
     1. Continue to importing Custom certificate(s) and key(s) for Machine SSL certificate

     2. Exit certificate-manager 

Option [1 or 2]: 1

Please provide valid custom certificate for Machine SSL.
File : /root/SSLCerts/machine_ssl.cer

Please provide valid custom key for Machine SSL.
File : /root/SSLCerts/machine_ssl.key

Please provide the signing certificate of the Machine SSL certificate
File : /root/SSLCerts/ca.cer

You are going to replace Machine SSL cert using custom cert
Continue operation : Option[Y/N] ? : y
Status : 100% Completed [All tasks completed successfully] 


Valid cert on vCenter 6.0 Web Client
References:
http://kb.vmware.com/selfservice/microsites/search.do?language=en_US&cmd=displayKC&externalId=2111571&src=vmw_so_vex_mgray_1080
http://blogs.vmware.com/vsphere/2015/07/custom-certificate-on-the-outside-vmware-ca-vmca-on-the-inside-replacing-vcenter-6-0s-ssl-certificate.html?src=vmw_so_vex_mgray_1080
http://kb.vmware.com/selfservice/search.do?cmd=displayKC&docType=kc&docTypeID=DT_KB_1_1&externalId=2097936&src=vmw_so_vex_mgray_1080


credit:https://blah.cloud/security/using-ad-signed-certificates-with-vcenter-server-appliance-6/

Wednesday 10 May 2017

Add vCenter to domain with Single sign on

How to Join AD Domain in vCenter Server Appliance 6.0 (vCSA)

In vSphere 6.0 the vCenter Server Appliance (vCSA) has been changed a lot. Joining an Active Directory Domain is now included in the infrastructure node configuration which is part of the Platform Services Controller. Please note standard AD requirements like time synchronisation and naming. You can't join an AD if you've set an IP address as name during the VCSA guided installer.

  1. Open vSphere Web Client (https://[vcenter]/vsphere-client)
  2. Login as Single Sign-On Administrator (Password set during installation)
  3. Navigate to Administration > Deployment > System Configuration
    vsphere60-web-client-administration vsphere60-web-client-system-configuration
  4. Open Nodes and select the infrastructure node that is associated with Single Sign-On
    vsphere60-web-client-infrastructure-node-config
  5. Navigate to Manage > Advanced > Active Directory
    vsphere60-web-client-infrastructure-node-join-ad
  6. Click Join...
    vsphere60-web-client-infrastructure-node-join-button
  7. Enter AD domain information
    vsphere60-web-client-join-domain
  8. Press OK
  9. Reboot the Appliance
When the appliance comes back up it is now part of the Active Directory Domain. The next step is to configure the AD as identity source to login to the vCenter with AD credentials.

  1. Open vSphere Web Client (https://[vcenter]/vsphere-client)
  2. Login as Single Sign-On Administrator (Password set during installation)
  3. Navigate to Administration > Single Sign-On > Configuration
    vsphere60-web-client-administration vsphere60-web-client-sso-configuration
  4. Open the Identity Sources tab
  5. Click the green + to add an identity source
    vsphere60-web-client-sso-add-identity-source
  6. Select Identity Source Type:
    A) Active Directory (Integrated Windows Authentication)
    This option works with both, Windows-based vCenter Server and vCenter Server Appliance. The underlying system (Windows Server or Infrastructure node of Platform Services Controller) has to be a member of the Active Directory domain.
    vsphere60-web-client-sso-ad-authB) Active Directory as a LDAP Server
    If the underlying system is not part of the Active Directory domain.Fill out the remaining fields as follows:
    Name: Label for identification
    Base DN for users: The Distinguished Name (DN) of the starting point for directory server searches. Example: If your domain name is virten.lab the DN for the entire directory is "DC=virten,DC=lab".
    Domain name: Your domain name. Example: "virten.lab"
    Domain alias: Your netbios name. Example: "virten"
    Base DN for groups: The Distinguished Name (DN) of the starting point for directory server searches.
    Primary server URL: AD Server URL. You can either query the local directory (Port 389), or the global catalog (Port 3268). Example: "ldap://dc01.virten.lab:3268"
    Secondary Server URL
    Username: A user in the AD Domain with at least browse privileges. Example virten\vcenterssovsphere60-web-client-sso-add-ldap-server
    Press Test Connection to verify AD connection
    vsphere60-web-client-sso-ldap-connection-established
  7. Click OK
  8. Back at Identity Sources your AD should appear in the list and from now on you are able to assign vCenter permissions to users and groups from your active directory.
  9. Select you Active Directory and click the world with arrow button to make AD to your default domain.
    vsphere60-web-client-select-default-domain
  10. To login with AD users, you have to set permissions. To add a AD user as global Administrator navigate to Administration > Access Control > Global Permissions
    vsphere60-web-client-global-permissions
  11. Click Add permission
    vsphere60-web-client-add-permission
  12. Click Add...vsphere60-web-client-add-permission-add
  13. Select the Active Directory domain under Domain, choose a user and press Add
    vsphere60-web-client-add-permission-add-aduser
  14. Press OK twice
You can now login to the vSphere 6.0 vCenter with your Active Directory Account.


vsphere60-vcsa-in-ad

Tuesday 9 May 2017

Windows vCenter Server 6.5 installation fails while configuring the vAPI EndPoint Service

Unable to install vCenter 6.5? and receiving one of the following errors.

Errors such as

503 Service Unavailable (Failed to connect to endpoint: [class Vmacore::Http::LocalServiceSpec:0x000000a5bb920790] _serverNamespace = /vsphere-client action = Allow _port = 9090)

503 Service Unavailable (Failed to connect to endpoint: [class Vmacore::Http::NamedPipeServiceSpec:0x000000a5ba8e4320] _serverNamespace = / action = Allow _pipeName =\\.\pipe\vmware-vpxd-webserver-pipe)

Windows vCenter Server 6.5 installation fails while configuring the vAPI EndPoint Service

One of the reasons this is a problem (not presently documented by Vmware)

Is because NTLM is being blocked. During my time chatting with Vmware support they hadn't come across this before and don't presently have a fix for changing NTLM to kerberos authentication.

However if you have the option to and capability to:

These are the following fixes.

- Allow NTLM in all forms on your domain.
- Setup vCenter Appliance. 
 
 If Vmware come back to me with a fix I'll update the page here.

 https://recommender.vmware.com/solution/SOL-12095


Monday 8 May 2017

Install Remote Desktop Services Tools

Here are the steps to install Admin pack for Windows 7

You can install the Administration Tools pack on a computer that is running the Professional, Enterprise, or Ultimate editions of Windows 7.
1)      Download appropriate Admin pack for Windows 7 from Microsoft Site ( 32 Bit or 64 Bit).
2)      Start the installation. Yes for Install update.
Admin Pack for Windows 7
3)      Once successfully installed, next screen shows how to install each feature of admin pack tool.  Without doing following steps you can’t find any of the administration tools in program files or control panel. Close the screen and go to control panel.
4)      Go to Programs and features. Select Turn Windows features on or off then select Remote Server Administration Tools as shown below.
Admin Pack for Windows 7
5)      Depends on the requirement of network you can select each option. As I mentioned earlier, you can manage Windows 2003,2008 and 2008 R2 Servers from Windows 7 client computer by this administration tools pack.  You must be in administrator group or administration tasks privilege should have been given to perform some of server tasks. In this example I select Remote Desktop Services Tools which help to manage multiple remote desktop connections in Windows 7 computer.
Press OK.
6)      So newly added administrations pack tool feature can be found under Administrative Tools in Windows 7.
Admin Pack for Windows 7
The other administrative pack tools which you select also will be listed under Administrative Tools.
Even you can install Server Manager in Windows 7 and do the same all server tasks in Windows 2003,2008 and 2008 R2 from Windows 7 client.
I’m sure this article explained about how to install Admin Pack for Windows 7 to get remote desktop manager and to enable other administration tasks.

Credit: http://www.sysprobs.com/install-admin-pack-windows-7-remote-desktop-manager