Thursday 2 June 2016

ESXI Host


esxcli software vib update -d /vmfs/volumes/datastore1/update-from-esxi6.0-6.0_update02.zip

Wednesday 1 June 2016

Mount VMFS Datastore – via GUI or via CLI

You can resignature a disk by using the vSphere Client or using the command line. vSphere client gave me no results recently, but normally it’s very easy. You just do it when you firstselect your host > configuration > storage > add storage >  chose disk/lun > and choose the option you want.
Select Assign new signature or keep existing signature, depending on your needs, and click next, next …
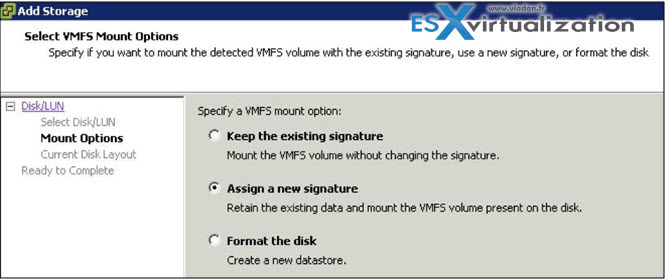
how to resignature VMFS

Using ESXCLI

We can list all detected VMFS snapshot volumes with the following command, even if for some reason we aren’t able to mount the volume from within vSphere client (it was my case in a lab recently…).
This command will list the names of the VMFS datastores and their UUIDs.
esxcfg-volume –l
As you can see in our case we have the output like this:
Mounting VMFS datastore manually is sometimes necessary when working with DR plans. A volume that isn't automatically mounted on the other side has to be mounted manually. Sometimes when an existing VMFS volume           Keep the existing signature. You cannot mount two datastores with the same UUID on the same host.  ESX uses the UUID to reference the device. As such, two with the same UUID would cause all kinds of issues. However, you may unmount the initial datastore and bring the duplicate datastore with the same UUID online. You can however mount a snapshot/replicated lun, whilst keeping the existing signature, on a host that does not have access to the original lun (this is most commonly seen when carrying out a DR plan). Assign a new signature. This will change the UUID and allow it to be mounted.     There are some things to bear in mind before you make your choice. Creating a new signature for a drive is irreversible – once you have applied the new signature you cannot get the old one back. A datastore with extents may only be resignatured if all extents are online. Finally, if a datastore is resignatured, the VMs that use a datastore must be reassociated with the disk in their respective configuration files. The virtual machines must also be re-registered within vCenter.  The most common scenario in which I come across having to deal with this issue is when working with a disaster recovery plan. When Site Recovery Manager isn’t it use, it is necessary to carry out the mounting of replicated/snapshot luns manually. In this situation it is usually ok to mount the lun without resignaturing  because the host to which you mount the lun is likely in a DR site, and as such doesn’t have access to the original lun. Basically, it’s fine not to perform the resignature when mounting the volume on a host that is unable to see the original disk. Resignaturing becomes important when you need to mount a replicated lun on the same host(s) that have the original mounted.  So, hows it done? You can resignature a disk by using the vSphere Client or using the command line.  Using ESXCLI we can list all detected VMFS snapshot volumes with the following: <blockquote>esxcli storage vmfs snapshot list</blockquote>   This will list the names of the VMFS datastores and their UUIDs. We can then mount the volumes using:  esxcli storage vmfs snapshot resignature –volume-label=<label>|–volume-uuid=<id> As these commands are ran directly on a host, it is necessary to run them on each host in a cluster, if you want to make the volume available to each. NOTE: You will only be able to mount the volume if it has been enabled for Read/Write access – in most environments this will be handled by the storage guys.  As an alternative you can also use the esxcfg-* commands, as follows:  ‘esxcfg-volume –l’ to see a list of copied volumes  Choose either;  ‘esxcfg-volume –r to resignature the volume  ‘esxcfg-volume –M to mount the volume without resignaturing (use lower case m for temporary mount rather than persistent). The process using the vSphere client is as follows:  On your chosen host, browse to the Configuration | Storage tab Click Add Storage Select Disk/LUN and click Next Select the device you wish to add add and click Next Select Assign new signature or keep existing signature, depending on your needs, and click                 <strong>1. Log in to the vSphere Client and select the server from the inventory panel.</strong>  <strong>2. Click the Configuration tab and click Storage in the Hardware panel.</strong>  <strong>3. Click Add Storage.</strong>  <strong>4. Select the Disk/LUN storage type and click Next.</strong>  <strong>5. From the list of LUNs, select the LUN that has a datastore name displayed in the VMFS Label column and</strong>  <strong>click Next.</strong>  <strong>The name present in the VMFS Label column indicates that the LUN is a copy that contains a copy of an</strong>  <strong>existing VMFS datastore.</strong>  <strong>6. Under Mount Options, select Keep Existing Signature.</strong>  <strong>7. In the Ready to Complete page, review the datastore configuration information and click Finish.</strong>        o you are forced to this as described in the knowledge base article above in workaround B (By connecting directly to the ESX host service console):  1. Log in as root to the ESX host which cannot mount the datastore using an SSH client.  2. Run the command:  esxcfg-volume -l  The results appear similar to:  VMFS3 UUID/label: 4b057ec3-6bd10428-b37c-005056ab552a/ TestDS  Can mount: Yes  Can resignature: Yes  Extent name: naa.6000eb391530aa26000000000000130c:1 range: 0 – 1791 (MB)  Record the UUID portion of the output. In the above example the UUID is 4b057ec3-6bd10428-b37c-005056ab552a.  Note: The Can mount value must be Yes to proceed with this workaround.  3. Run the command:  esxcfg-volume -M <UUID>  Where the <UUID> is the value recorded in step 3.  Note: If you do not wish the volume mount to persist a reboot, the -m switch can be used instead.
Choose either:
esxcfg-volume –r
to resignature the volume. The general syntax is following:
esxcli storage vmfs snapshot resignature –volume-label=<label>|–volume-uuid=<id>
OR use the “M” switch (note it’s a Capital M) to mount the volume as is (keep existing signature):
esxcfg-volume –M
to mount the volume without resignaturing (use lower case m for temporary mount rather than persistent).
mount existing VMFS volume
Yes, if you do not wish the volume mount to persist a reboot, the -m switch shall be used instead.

source:http://www.vladan.fr/mount-vmfs-datastore/